Inclinometers – Why and how would I choose one?
Grab a coffee and settle yourself in for a big read – this article is a great resource for everything regarding inclinometers, but because it’s so large we’ve decided to separate it into sections. Feel free to skip to the desired section by using the “Table of Contents” to your right-hand side of the page.
What is an Inclinometer?
An inclinometer or clinometer is an instrument used for measuring angles of slope, elevation, or depression of an object with respect to gravity’s direction*. In respect to child safety seats and inclinometer is necessary to ensure that the angle of the seat is fitted within the tolerance/guidelines outlined by the manufacturer and Australian standards.
Some Australian child seats are now being manufactured with inclinometers, sometimes referred to as “level indicators”, built into the seats. This is brilliant for usability from the client’s perspective, but also due to the manufacturing variations may not be completely accurate. If you choose to utilise the seat’s built in indicator, rather than your own tool, you will need to refer to the manufacturer’s instructions in regards to how it was intended to be used – there are variations of acceptance between different units. For example, let’s talk about the Britax B-First’s level indicator. This indicator is used only for Rearward Facing installation.

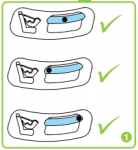 Although it’s not written on the instruction manual, the image (pictured right) indicates in the third image that it is acceptable for the “ball” level indicator to be partially hidden. Britax have since put out a fitters FAQ update that directly addresses this;
“The ball should not be completely hidden in rearward facing mode. It’s OK to see part of the ball.”
This design is most certainly not consistent across all child safety seats, so you will have to refer to the manufacturers instructions to ensure you are fitting every seat with it’s own inclinometer correctly.
What types of Inclinometers would be practical?
Phone App
Both Android and Apple have many useful apps that include an inclinometer suitable for finding the installation angle of a seat, however the accuracy of the angle is only ever going to be as good as the built in inclinometer of your phone or tablet.
- Only as good as the hardware built into phone (bad phone = unreliable accuracy)
- Not the best presentation for a client
- Depending on your phone you may have to use the phone on its side, or on its back
- The size of a phone can be perfect to measure angles in child seats
Hardware
These types are generally more accurate, and because they are built for purpose can give a better professional representation to your client. They can be digital, or analogue. It’s best to find a small solution because lengths over about 200mm can throw the angle out due to the headrest of the seat.
There are many places you could check to purchase one from such as;
- Your local hardward store, or Bunnings
- Amazon or eBay
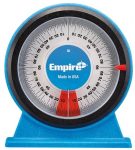 Analogue
- Price Guide: $30 -$50
- Accurate
- Professional
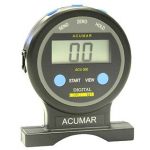 Digital
- Price Guide: $50+ (Pictured left is over $500)
- Accurate
- Professional
Digital Spirit Levels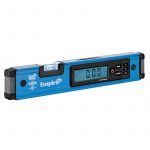
- Price Guide: $80+ (Pictured right is over $100)
- Accurate
- Professional
- Cumbersome if long, resulting in difficult accurate results.
Why would I want to use one?
When transporting newborn babies or younger children in rearward facing mode it’s important choose a seat angle that is optimised for your child’s needs. This range is specified by the AS/NZS 1754:2013 std. Too flat is not good in a frontal collision, too upright is not good for supporting your baby’s head and neck whilst transporting them.
As a child safety seat technician, it is not only your responsibility to ensure that the angle of the seat is within this tolerance range outlined by the AS/NZS 1754 but also to record this in your logs.
This expectation is actually an asset! If you present this correctly and professionally, it can significantly affect your street cred with your client as it’s not something a general consumer will perform on their own installations – and it literally only takes a couple of seconds to measure. Given time, as your gain experience, your eye will help you gauge whether a seat is within tolerance and you will find that as you measure the angles you will know when a seat is not fitted correctly. As you document the angle of the seat, and your client see’s you taking care and using specific tools to accurately measure the angle of the seat you re-enforce your professionalism and therefore value add to your service.
What angles are seats supposed to be?
As outlined in the AS/NZ 1754:2013 standard, the backrest of the safety seat in rearward facing should not exceed 45° and its best practice to have the backrest between 35° and 45° range.
Conclusion
If you are not already measuring and logging the angle of every child safety seat you fit, then start now! It is a great way to set yourself apart from a standard install and add value to your service while ensuring that every seat you fit or give advice on is complying with the recommendations.
Bibliography
* Source: https://en.wikipedia.org/wiki/Inclinometer
NB: This site contains information intended only for the person on the ACRI membership list and is subject to legal privilege. Any duplication or copy, even in segments, infringes on copyright